Crimson Desert players are already running headfirst into one of Chapter 9’s most satisfying “aha!” moments: the Spire of the Sun mirror puzzles in the Valley of Grief during the Crossing Point mission. It’s a classic light-reflection brainteaser—pushable mirror cubes outside, then a spiral climb inside—except it’s also the kind of puzzle that can chew up your evening if you don’t know the exact placements.
Below is a clean, practical Spire of the Sun puzzle guide: how to solve both outdoor mirror setups, how to handle the interior mirror climb, and what to expect when the final beam hits home.
Spire of the Sun: Where the Puzzle Happens (and Why It Matters)
The Spire of the Sun puzzle is tied to the Crossing Point mission in Chapter 9, set in the Valley of Grief. Mechanically, it’s built around moving cubes with mirrors to route a beam of light into a crystal, which then points you onward to the next stage.
What makes this one stand out is how “physical” it feels compared to symbol-button rooms or dial puzzles: you’re literally shoving mirror blocks around the environment, then transitioning into a vertical interior sequence where you’re aiming mirrors as you climb. It’s a great showcase for Crimson Desert’s puzzle variety—especially alongside other early standouts like Azure Moon Labyrinth, Spire of Insight, and Trembling Woods.
Game info (as listed): Crimson Desert launched March 19, 2026. Developer/Publisher: Pearl Abyss. ESRB: Mature 17+ (Blood, Drug Reference, Intense Violence, Strong Language).
How to Solve Spire of the Sun Puzzle #1 (Outdoor Mirrors)
The first Spire of the Sun puzzle is the warm-up, but it still trips people up because it’s easy to overthink. The key is that the mirrors you need are on movable boxes.
How to move the mirror boxes
- Push them by walking into them.
- Pull them by stabbing your sword into the box and dragging it:
- The guide notes L1 + Triangle to stab and then use the Left Stick to move it that way.
The actual solution
- Look to the left-side mirrors.
- You need the two mirror boxes positioned so they form a large square:
- Place one mirror box in the top-left corner
- Place the other mirror box in the bottom-left corner
- When they’re correctly placed, the light will reflect into the crystal, and the game will direct you to the next puzzle.
This first puzzle is essentially teaching you the rule of the road: mirror cubes aren’t about “close enough.” They’re about exact corners and clean angles.
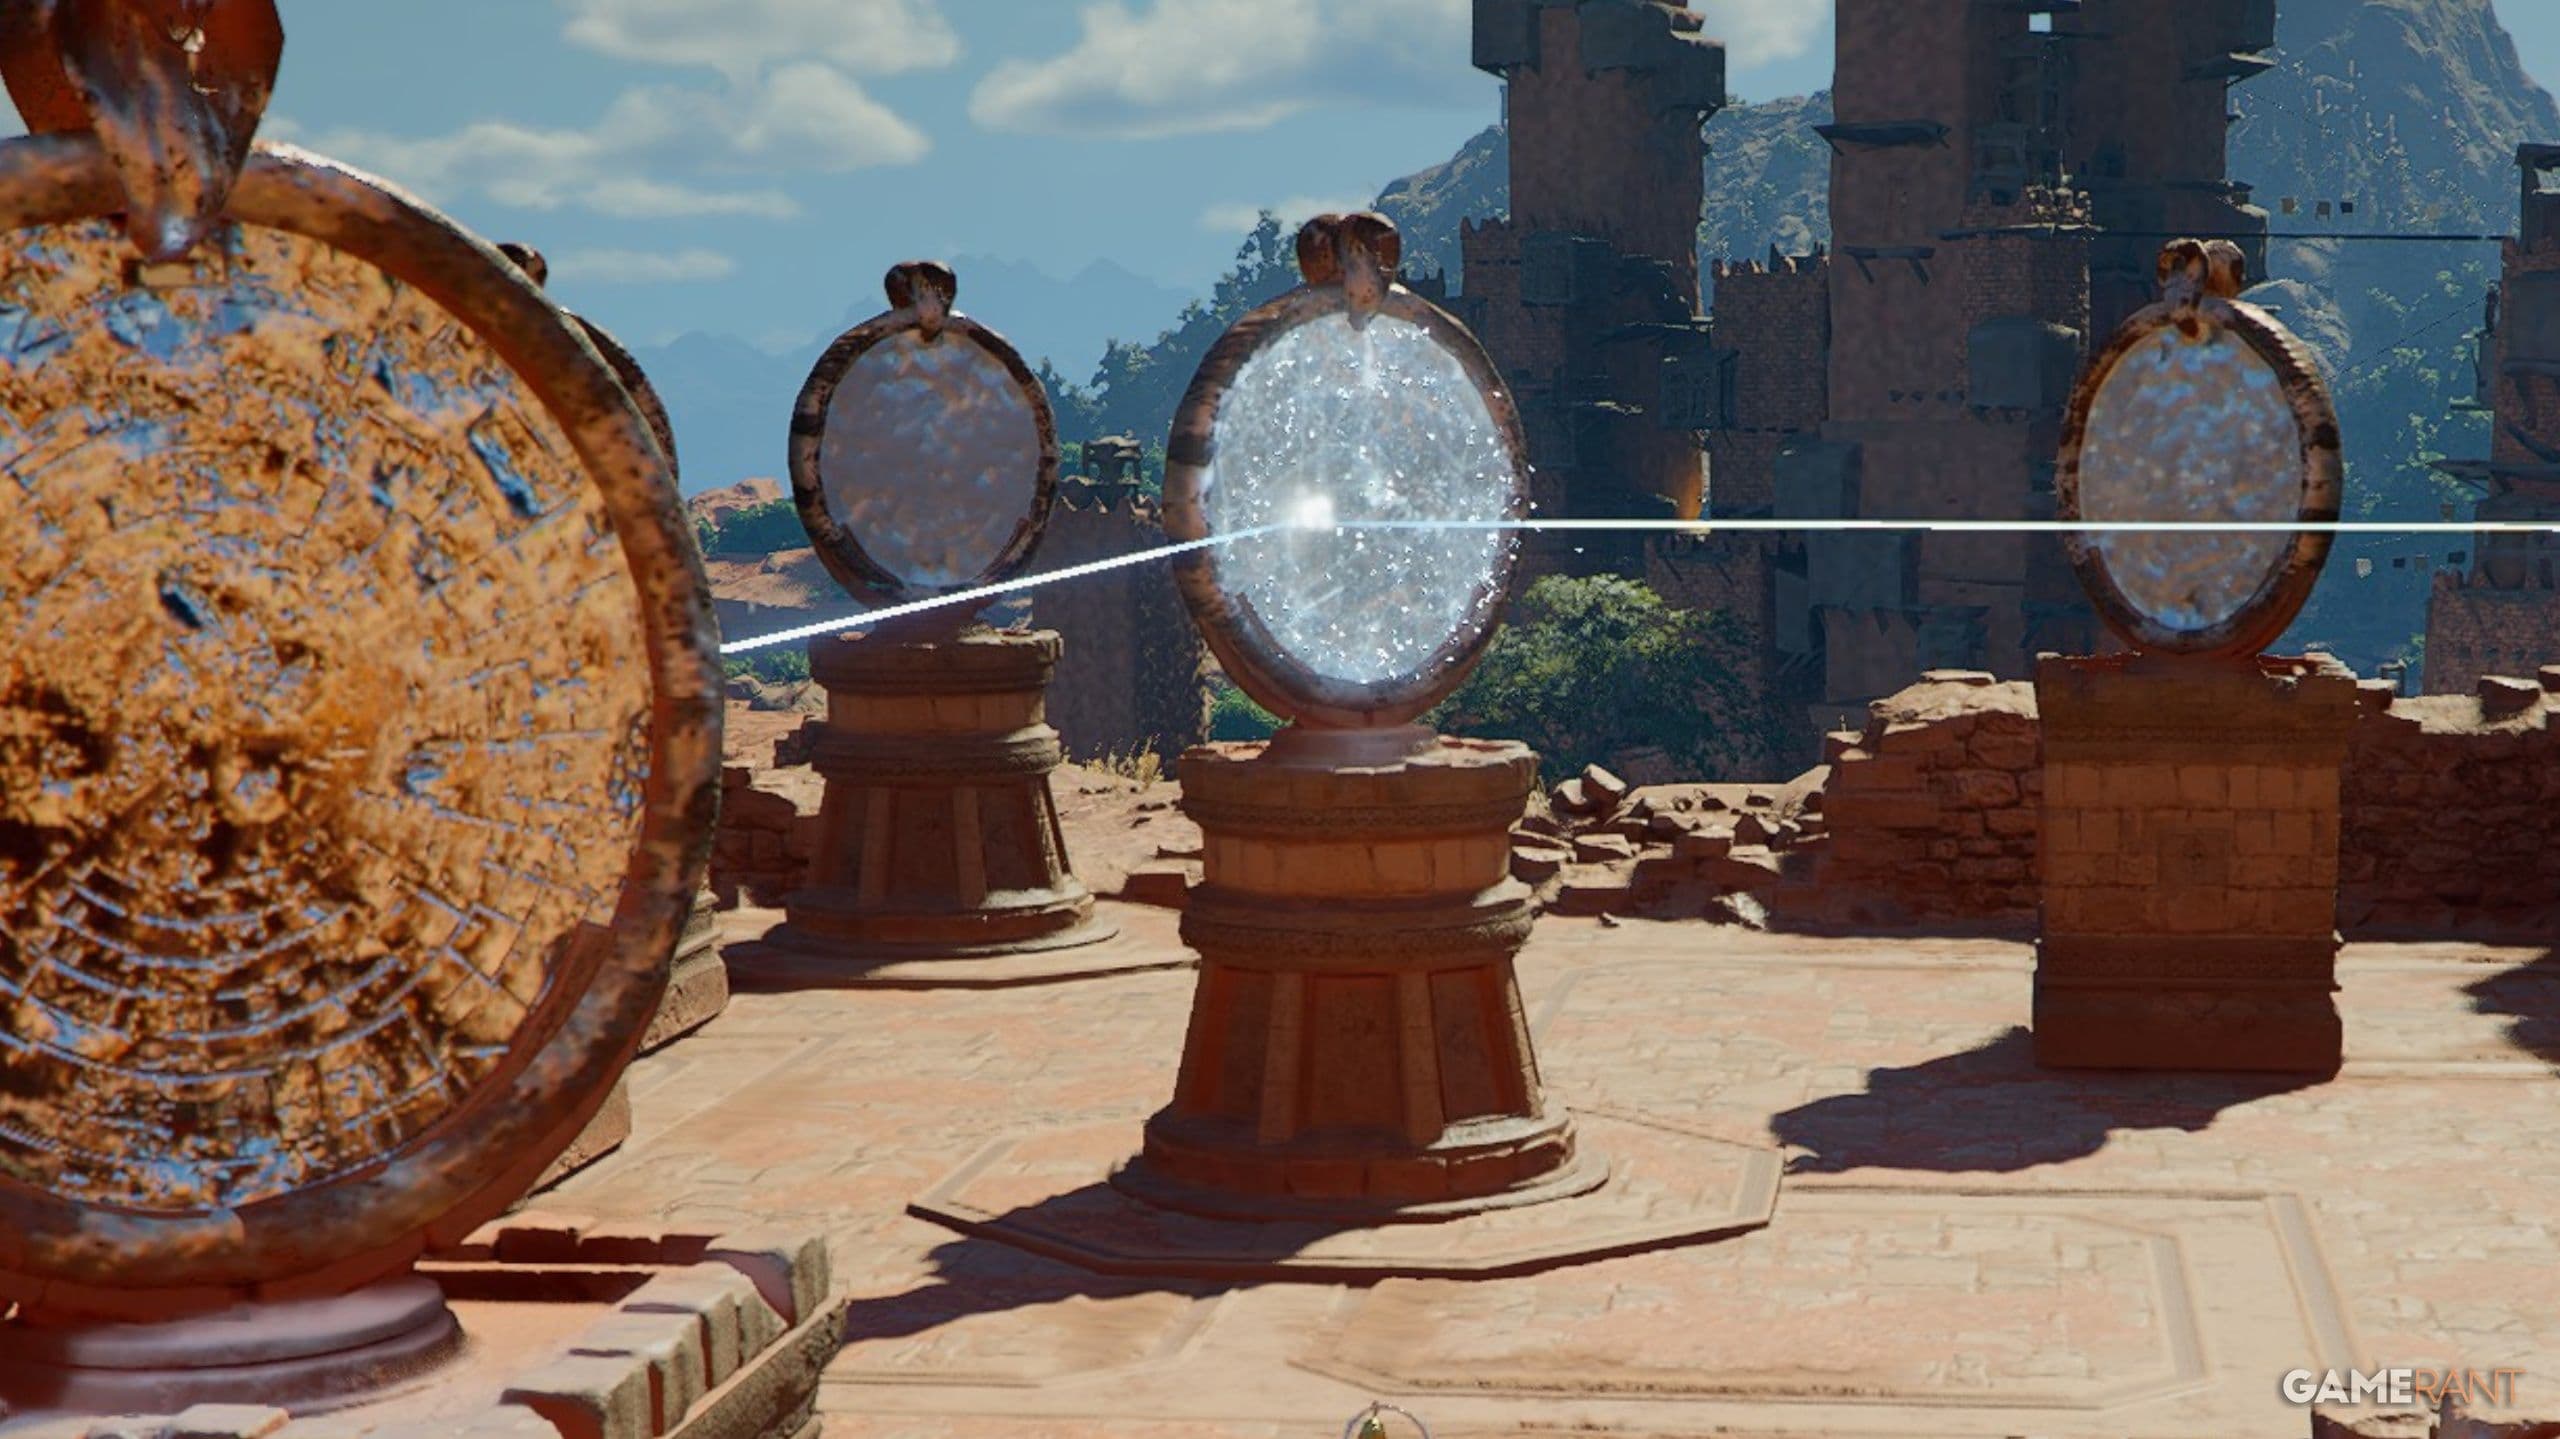
How to Solve Spire of the Sun Puzzle #2 (Outdoor Mirrors, Full Placement Order)
Puzzle #2 is the real deal: multiple mirror cubes, a couple of stationary mirrors, and a route that looks like it should work even when it doesn’t. The good news is there’s a precise placement order that reliably completes the circuit.
The solution is described using labeled blocks A–E. Follow these steps:
Move A into the back-left corner
- This reflects light onto a static mirror that cannot be moved.
Move B into the top-left corner
- This reflects light to the right.
Move C into the back-middle section
- This reflects light onto the right, toward the crystal.
Move D to the back-right, right next to C
- This reflects to a stationary mirror on the left, and then back to A.
Move E all the way to the right
- This reflects light into the last stationary mirror in the middle, which then reflects into the crystal.
Once the beam hits the crystal, you’ve cleared the outdoor portion and can move on to the Spire itself.
How to Climb the Spire of the Sun (Interior Mirror Steps + The “Aim Lower” Trick)
After completing both outdoor mirror puzzles in the Valley of Grief, you can use the Wings to fly toward the Spire of the Sun and head inside.
From here, the puzzle becomes a vertical relay: you’re climbing stairs and aiming mirrors so the beam continues upward from one reflector to the next.
Interior walkthrough (Unwavering Steps section)
- Go up the stairs and interact with the mirror.
- Aim the mirror using the D-Pad so it reflects light to the mirror up and left.
- Go up the stairs and repeat this process at the next mirror.
- Continue up the spiral stairs, reflecting the beam into each subsequent mirror.
Final step: reveal the elevator
- The final mirror must shoot the beam onto the ceiling, which unveils the Spire of the Sun Abyss elevator.
Important note (this is where players get stuck)
Sometimes the beam needs to be lower than you think. If you’re certain the angle is right but the connection isn’t “taking,” adjust the mirror height downward and experiment until the beam links properly between the first and last points.
That “aim lower” detail is the difference between a clean solve and 20 minutes of swearing at a mirror that looks correct but isn’t registering.
How This Fits Into Crimson Desert’s Bigger Puzzle Web (Azure Moon, Insight, Trembling Woods, and More)
One of the coolest things about Crimson Desert right now is how aggressively it pushes puzzle variety across Pywel—mirrors, lasers, rotating murals, pillar height alignment, and riddle towers. If you’re chasing Abyss Cressets, Abyss Artifacts, or just trying to clear every “mysterious energy” marker you see, you’re going to bounce between very different logic styles.
Here’s how a few other major puzzles work (and why Spire of the Sun feels distinct):
Azure Moon Labyrinth (Witchwoods / Phoniel Ranch)
This one is part ancient ruin crawl, part symbol-button solution:
- The entrance is hidden: a ladder inside a small wooden booth in Phoniel Ranch, northeast of the Witch’s House in the Witchwoods.
- Underground, you navigate hazards like flamethrowers and traps to reach the puzzle room.
- The puzzle room has eight symbol buttons, and you must press five correct ones (order doesn’t matter) to open the exit.
Solution (button positions):
- On the western wall (left to right): press 1st, 3rd, 4th
- On the eastern wall: press the middle two
Rewards mentioned:
- An Abyss Cresset (fast-travel station unlock)
- Memory of Tide, which reveals the location of eight caves in Alfonso State in Hernand when used
Notably, there’s also an extra layer of “intended” clue-hunting tied to the wall map and identifying the region, with a reference to needing to complete the “Trembling Woods” mission to access Pororin Village for clue context.
Spire of Insight (tower riddles + item placement)
Where Spire of the Sun is about spatial beam routing, Spire of Insight is about riddles and scavenging objects to place into a bowl:
- You burn thorny roots with Blinding Flash to access the door.
- To open the door, you pick up a Small Pebble from the doorstep and place/drop it into the basin.
- Then you solve three floors of riddles by finding items and putting them in the bowl:
- Gravestone
- Pen Tip + Telescope
- Small Map Rotator + Celestial + Sundial
- At the top, you reach an Abyss Gate leading to Chaos Forest.
One practical detail: the “place” command can be buggy; it’s recommended to walk up and drop items into the bowl instead.
Trembling Woods (turnstiles, mural alignment, rings)
This is a mechanical alignment puzzle:
- Three mechanisms control different layers:
- Right: background mural
- Middle: large ring
- Left: two medium rings (requires a sword stab to create a handle)
- Correct alignment includes a large star top right, a small moon near the bottom, and an eclipse icon to the left.
- Completing it opens a small door with an Abyss Cresset (and an Abyss Artifact reward is mentioned).
Duskwood Hill Ruins (pillar height alignment)
A finicky “get everything to match” trial:
- Burn vines (fire arrows or Blinding Flash) to reveal mechanisms.
- Align five pillars to the same height using a dial you manipulate by stabbing to create a handle.
- When aligned, pillars glow (yellow during alignment steps; blue when completed).
- Reward: Abyss Cresset for an Abyss Artifact.
Passage of Malice (Axiom Force laser routing)
Different flavor of beam puzzle: lasers and nodes rather than mirrors and sunlight.
- Use Axiom Force to pull lasers into place and connect to crystal nodes.
- You rotate cubes via yellow circles using R2/L2 and the D-Pad.
- After solving, you pull a battery into place with Axiom Force, hit it with Force Palm, activate a dial with Force Palm, then use a teleporter to claim an Abyss Artifact and connect to an Abyss Gate.
All of that context matters because Spire of the Sun sits in a sweet spot: it’s readable, physical, and cinematic—less abstract than symbol slabs, less fiddly than pillar micro-adjustments, and more “adventure puzzle” than pure logic test.
What Remains Unknown
Even with the puzzle solutions nailed down, a few details around the Spire of the Sun sequence aren’t fully clarified in the available guidance:
- Exact rewards for completing the Spire of the Sun beyond revealing the Abyss elevator haven’t been explicitly detailed here.
- The full scope of what the Abyss elevator connects to (specific Abyss region or follow-up encounters) hasn’t been confirmed in this walkthrough material.
- No official timing or progression notes are provided on whether the Spire of the Sun can be completed outside the Crossing Point mission flow, or if it’s best handled during Chapter 9 as intended.
If you’re working through Crimson Desert’s puzzle circuit efficiently, the big takeaway is simple: solve the two outdoor mirror layouts cleanly, then inside the Spire remember the golden rule—when the beam looks right but won’t connect, aim lower than your instincts tell you. That’s the run-saver.